The images on this page require that the colour depth be set to something greater than 256 colours per pixel* (8 bits), either 16 or 24 bits is OK. If you are running Windows on a PC, then you can check this by right clicking on a blank part of the desktop and then selecting "Properties" and then "Settings" tab. The colour depth is displayed and adjustable from there.
* A pixel (Picture Cell) is the smallest part of a digital picture. These are square in shape. Image sizes are normally given as X pixels by Y pixels.
This page is intended as a simple guide for both beginners and those more experienced in generating web pages who may not know a lot about digital images (both Graphics and Photographs). In this article, I use the term "Graphics" to mean those images which are hand generated by the use of graphics software, but "Graphics" can also be used to cover any image, including photographs.
There are many ways of descibing a graphic or photograph by means of a digital file, for instance Graphics Interchange File(.gif), Tagged Image File (.tif), Bit Map file (.bmp), Portable Network Graphics (.png), JPEG (.jpg), Run Length Encoded (.rle), etc. Each of these formats has its own specific use, for instance .tif files are used in the printing industry. Some file types describe the image pixel* by pixel (such as .bmp), and others use compressed versions of the information to generate the image.
Most image file types can be found in pages on the web, however not all Web Browsers can display all the file types. As a consquence of this you will normally only find two different types, .gif (GIF) and .jpg (JPEG).
As a general rule I would recommend that JPEG files should be used for photographs, and GIFs for what I would call Graphics. Both of these file types use compression to reduce the size of the file as compared with an uncompressed file such as BMP. The more compression that can be applied, the shorter the time to download the file to your PC from the Internet, however this does of course rely on the Web Browser being able to de-compress the data, and if your Browser doesn't recognise the file type, then you won't be able to display it.
Whilst there are many different algorithms for compressing digital image data, these algorithms fall into two different categories: lossy and non-lossy.
As the name implies, Non-lossy, means that when you decompress a file, you get out exactly what was put in (GIF and PNG files are examples of this, but see later about GIF compression). A page with comparisons of file sizes of images produced by JPEG, GIF, PNG and BMP formats can be seen here as Example 1.
On the other hand, Lossy means that you lose some information when you compress the file, and so you get out an image which has lost some of the detail of the original, and each time you re-compress the file, you lose a bit more (JPEG files are an example of this). Using lossy compression is analogous to photocopying; each time you photocopy a photocopy you lose some more detail until in the end the page is almost unreadable. There are however exceptions to this situation, but it is very difficult to meet the requirements for these, so they are ignored in this short article, but are given in detail in the article in the jpeg faq pages.
If you are generating files yourself by means of a scanner, then you need to save the files with non-lossy compression. Most scanner software will allow you to save the file as a TIFF (.tif) and some will allow you to use PNG which will give you better compression and thus smaller files. You need to be aware that there are several forms of compression used when saving TIFF files, and also non-compressed. Always be sure to save the best quality image you can at the scan stage, e.g. don't reduce the number of colours etc., as you can always edit the image and save it to another file without destroying the original, however if you modify the original, you won't be able to get back to it without re-scanning. When dealing with photographs, no matter how you generated them, you should always save the files with 16.7 million colours if you will later be converting them to JPEG images, as the JPEG alogorithm is optimised for this number of colours.
If you are considering OCR (Optical Character Recognition), then the format to use is uncompressed TIFF, 2 colour (black and white).
If you are using a Digital camera to generate files, except with the most expensive cameras, you will have no option but to download the files from the camera as JPEG files. Most cameras allow you to set the amount of compression (and thus the number of photographs you can store) when taking the photograph. The effects of JPEG compression are described below.
Looking at the images in Example 1, it appears that the file is going to be about twice the size if you use GIF compression as compared with the size you would get if you use JPEG compression. However, GIF compression compression can only use 256 colours (i.e. it can only use 8 binary bits to describe the colour of a pixel). Whilst these 256 colours can be any 256 colours, this doesn't normally help much with photographs as they tend to use millions of colours (requiring at least 16 binary bits). The result of this is that if you use a GIF file to contain a photograph image, colour graduations start to have steps at each of the colour changes. Whilst not aparent in the Example 1, zooming in to the images will show the differences as in Example 2. This means of course that when compressing a photograph, you will effectively get lossy compression from a GIF file, as you don't get out what you put in, however GIF compression is quite effective when dealing with less than 256 colours such as in Graphics files.
JPEG compression, as was previously mentioned, is a lossy compression. With most graphic and photo. editor programs, the amount of loss can be adjusted when you save the file in .jpg format. I personally use Paint Shop Pro.* for editing photographs and graphics, and the loss when saving from this program is adjustable on a scale of 1 to 99, but other programs use different scales. Example 3 shows the photos. used in Example 1 saved with increasing amounts of compression. When deciding just how much compression to put on a file you will find that you need to zoom in to a factor of around 5:1 in order to see what is happening to the detail of the photo. as you change the amount of compression and then come to a decision as to where the optimum for the file size and amount of detail is. I normally use between 10 and 20 in Paint Shop Pro., though 40 is quite acceptable in a lot of circumstances.
One thing to remember when dealing with JPEG files is that each time you edit and re-save the file, you are losing a bit of detail (photocopy of a photocopy effect). To avoid this it is a good idea to save the original file in a non-lossy format if possible, (not GIF - see above about 256 colours) as mentioned above in "Generating Files". You can then edit and save the file, and do the conversion to JPEG for web use only.
* The common give-away version of Paint Shop Pro, 4.14SE does not support the saving of GIF files. This is to avoid having to pay Compu$erve the royalties on the patented/copyrighted algorithm.
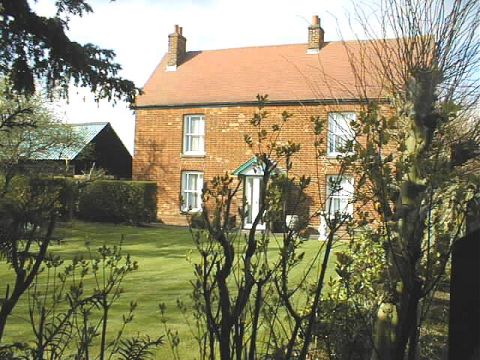
Most people using the World Wide Web from home use a 56K modem. The maximum download rate I have ever managed to get out of my modem is around 5Kbytes per second for binary (as opposed to ASCII/text) data. I am normally prepared to wait around 10-15 seconds for a photograph to download, which would mean that I wouldn't like to have to sit there while a file of over 75Kbyte downloads to my browser. Experience shows that this equates to a photograph of around 480 pixels by 320 pixels and a compression of 10 using JPEG from Paint Shop Pro., however the final size of the file is also dependent on the content of the photo. An example of 480 by 320 pixels with the compression set to 20 is shown below. This image has a file size of just under 56Kbytes.
Hopefully, you didn't have to wait for this photo to download, as you should have been reading the text above while the download was going on, but even if you had been waiting, it shouldn't have taken much over 10 seconds to download.
You need to be aware that Hyper Text Mark-up Language (html) and WYSIWYG (What you see is what you get) Web page editors allow you to insert an image into a web page with a display size smaller than the actual image. An example of this is shown below. The image file used for the photo. above is the same one as shown below, but the size is forced to 120 by 90 pixels by the browser for the display.
It does of course take exactly the same amount of time to download the images, but the user only sees a fraction of the size of image that he/she downloaded. In order to avoid this situation, I would recommend that you never resize an image in a WYSIWYG editor, and if you set the size in html, then set the size so that it is the same as that of the image you are using. If the image size is too large for you, then re-size it using a photo editor so that the real size is as you want it.
I have seen instances where a 2048 by 1768 image has been used to produce a photo of 120 by 90 (the same as the small one above). The file size of an image 2048 by 1768 is over 500,000 bytes (500K), and the file size of a 120 by 90 image is less than 5,000 bytes, thus the user is downloading 100 times as much data as he/she actually needs to display the image. This type of problem is very common due to it being so easy to re-size an image in a WYSIWYG page editor using the "handles", with no warning being given by the software.
Gif compression, whilst not the best (the best is probably PNG), is excellent for compressing images which contain less than 256 colours, particularly if they contain 16 or less colours (but you must tell the software that this is the case). The map shown below is a small section of my detailed map of Yorkshire and the image file is 16Kbytes in size (the equivalent PNG file is about 14Kbytes). Below the map you will see a section of this zoomed in by a factor of 4. This shows that the edges of the characters and roads are still sharp:
|
 |
If the above image is saved in JPEG format with the compression
set to 20, (see Example
4, which should produce another browser window so that you
can compare) artifacts (pixels of the wrong colour) apear at a
fairly low level, but cause visible distortion of the image, even
at a zoom of 1. Example
5 shows the compression set to 40, giving medium level arifacts
and more distortion of the normal image, and Example 6 shows the compression set to 60
giving a large amount of distortion of the image.
The image sizes for the above examples are:
| Gif, 16 colours | 15,453 bytes |
| JPEG, compression = 20 | 49,909 bytes |
| JPEG, compression = 40 | 35,330 bytes |
| JPEG, compression = 60 | 27,426 bytes |
| BMP, (not shown) | 76,918 bytes |
showing that with a small number of colours, GIF compression gives by far the smallest file and by far the best image for display.
If you are dealing with photographs, then you should be using JPEG files, but remember:
If you are dealing with Graphics (hand drawn images) with a small number of colours, then you should be using GIF files, remembering:
Of course there are exceptions to every rule! If you are trying to display a very small photograph (say less than 120 pixels along the longest side), then a GIF file will probably be the thing to use as this, is the point at which JPEG image file and GIF image file sizes become nearly the same. You will of course still have the 256 colour problem, but with a small image this shouldn't cause too many problems, and the GIF file will probably give you better definition at this size.
Colin Hinson ©2004